Image by author
Strong Python and SQL skills are an integral part of many data professionals. As a data professional, you're probably comfortable with Python programming, to the point that writing Python code comes quite naturally to you. But are you following best practices when working on data science projects with Python?
Although it is easy to learn Python and create data science applications with it, it may be easier to write code that is difficult to maintain. To help you write better code, this tutorial explores some Python coding best practices that help with dependency management and maintainability, such as:
- Set up dedicated virtual environments when working on data science projects locally
- Improving Maintainability Using Type Hints
- Data modeling and validation using Pydantic
- profile code
- Use vectorized operations when possible
So let's start coding!
1. Use virtual environments for each project
Virtual environments ensure that project dependencies are isolated, avoiding conflicts between different projects. In data science, where projects often involve different sets of libraries and versions, virtual environments are particularly useful for maintaining reproducibility and managing dependencies effectively.
Additionally, virtual environments also make it easier for collaborators to set up the same project environment without worrying about conflicting dependencies.
You can use tools like Poetry to create and manage virtual environments. There are many benefits to using Poetry, but if all you need is to create virtual environments for your projects, you can also use the built-in venv module.
If you are on a Linux (or Mac) machine, you can create and activate virtual environments like this:
 # Create a virtual environment for the project
 python -m venv my_project_env

 # Activate the virtual environment
 source my_project_env/bin/activate
If you are a Windows user, you can check the documents on how to activate the virtual environment. Therefore, using virtual environments for each project is useful to keep dependencies isolated and consistent.
2. Add type hints for easy maintenance
Because Python is a dynamically typed language, you do not need to specify the data type of the variables you create. However, you can add type hints (indicating the expected data type) to make your code easier to maintain.
Let's take an example of a function that calculates the mean of a numerical feature on a data set with appropriate type annotations:
from typing import List

def calculate_mean(feature: List(float)) -> float:
         # Calculate mean of the feature
          mean_value = sum(feature) / len(feature)
          return mean_value
Here, type hints let the user know that the calcuate_mean The function takes a list of floating point numbers and returns a floating point value.
Remember that Python does not enforce types at runtime. But you can use mypy or similar to generate errors for invalid types.
3. Model your data with Pydantic
We previously talked about adding type hints to make code easier to maintain. This works fine for Python functions. But when working with data from external sources, it is often useful to model the data by defining classes and fields with the expected data type.
You can use built-in data classes in Python, but you don't get data validation support out of the box. With Pydantic, you can model your data and also use its built-in data validation capabilities. To use Pydantic, you can install it along with the email validator using pip:
$ pip install pydantic(email-validator)Below is an example of modeling customer data with Pydantic. You can create a model class that inherits from BaseModel and define the different fields and attributes:
from pydantic import BaseModel, EmailStr

class Customer(BaseModel):
	customer_id: int
	name: str
	email: EmailStr
	phone: str
	address: str

# Sample data
customer_data = {
	'customer_id': 1,
	'name': 'John Doe',
	'email': 'john.doe@example.com',
	'phone': '123-456-7890',
	'address': '123 Main St, City, Country'
}

# Create a customer object
customer = Customer(**customer_data)

print(customer)
You can take this further by adding validation to check if all fields have valid values. If you need a tutorial on using Pydantic (defining models and data validation), read Pydantic Tutorial: Data Validation in Python Made Easy.
4. Profile code to identify performance bottlenecks
Profiling code is useful if you are looking to optimize the performance of your application. In data science projects, you can profile memory usage and execution times based on context.
Suppose you are working on a machine learning project where preprocessing a large data set is a crucial step before training your model. Let's profile a function that applies common preprocessing steps, such as standardization:
import numpy as np
import cProfile

def preprocess_data(data):
	# Perform preprocessing steps: scaling and normalization
	scaled_data = (data - np.mean(data)) / np.std(data)
	return scaled_data

# Generate sample data
data = np.random.rand(100)

# Profile preprocessing function
cProfile.run('preprocess_data(data)')
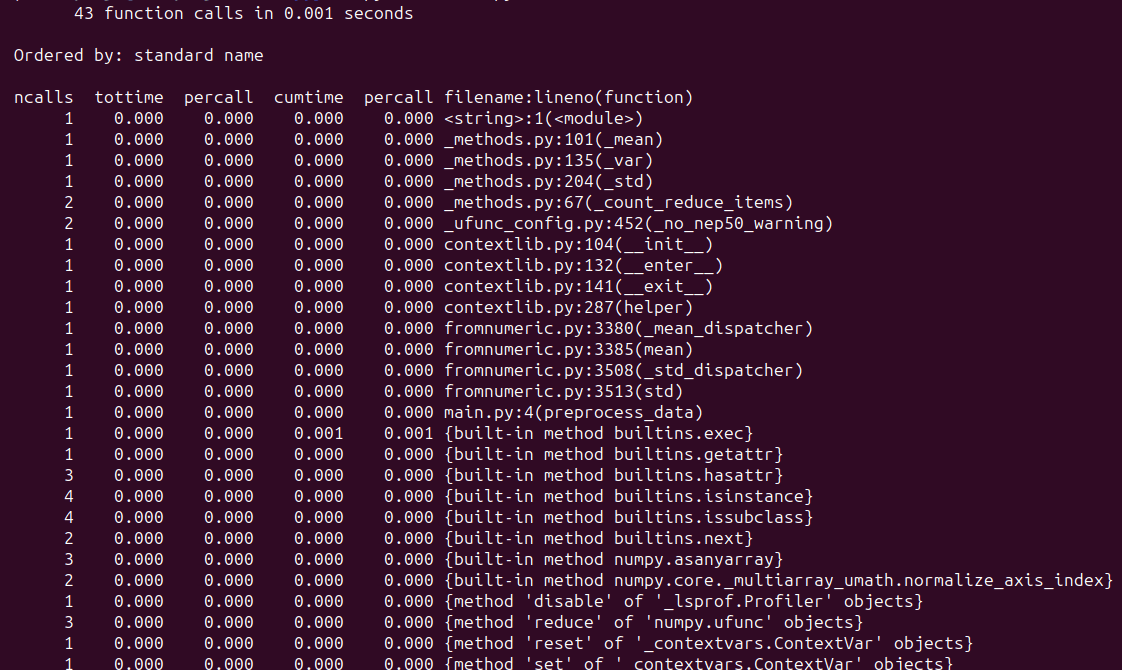
When you run the script, you should see similar output:


In this example, we are profiling the preprocess_data() function, which preprocesses sample data. Profiling, in general, helps identify potential bottlenecks, which guides optimizations to improve performance. Here are tutorials on profiling in Python that you may find useful:
5. Use NumPy's vectorized operations
For any data processing task, you can always write a Python implementation from scratch. But you may not want to do this when working with large sets of numbers. For the more common operations (which can be formulated as operations on vectors) that you need to perform, you can use NumPy to perform them more efficiently.
Let's take the following example of multiplication by elements:
import numpy as np
import timeit

# Set seed for reproducibility
np.random.seed(42)

# Array with 1 million random integers
array1 = np.random.randint(1, 10, size=1000000)
array2 = np.random.randint(1, 10, size=1000000)
Here are the Python and NumPy-only implementations:
# NumPy vectorized implementation for element-wise multiplication
def elementwise_multiply_numpy(array1, array2):
	return array1 * array2

# Sample operation using Python to perform element-wise multiplication
def elementwise_multiply_python(array1, array2):
	result = ()
	for x, y in zip(array1, array2):
    	result.append(x * y)
	return result
let's use the timeit function of the timeit Module to measure the execution times of the previous implementations:
# Measure execution time for NumPy implementation
numpy_execution_time = timeit.timeit(lambda: elementwise_multiply_numpy(array1, array2), number=10) / 10
numpy_execution_time = round(numpy_execution_time, 6)

# Measure execution time for Python implementation
python_execution_time = timeit.timeit(lambda: elementwise_multiply_python(array1, array2), number=10) / 10
python_execution_time = round(python_execution_time, 6)

# Compare execution times
print("NumPy Execution Time:", numpy_execution_time, "seconds")
print("Python Execution Time:", python_execution_time, "seconds")
We see that the NumPy implementation is ~100 times faster:
Output >>>
NumPy Execution Time: 0.00251 seconds
Python Execution Time: 0.216055 seconds
Ending
In this tutorial, we explore some Python coding best practices for data science. I hope you found them useful.
If you are interested in learning Python for data science, check out 5 Free Master Python for Data Science Courses. Happy learning!
twitter.com/balawc27″ rel=”noopener”>Bala Priya C. is a developer and technical writer from India. He enjoys working at the intersection of mathematics, programming, data science, and content creation. His areas of interest and expertise include DevOps, data science, and natural language processing. He likes to read, write, code and drink coffee! Currently, he is working to learn and share his knowledge with the developer community by creating tutorials, how-to guides, opinion pieces, and more. Bala also creates engaging resource descriptions and coding tutorials.
<script async src="//platform.twitter.com/widgets.js” charset=”utf-8″>
 NEWSLETTER


