In this blog post, we will try to explain the technology behind the widely used Tesseract Engine, which was upgraded with the latest knowledge researched in optical character recognition.
This article will also serve as a how-to guide/ tutorial on how to implement PDF OCR in python using the Tesseract engine. We will be walking through the following modules:
- Tesseract OCR Features
- Preprocessing for OCR using OpenCV
- Running Tesseract with CLI and Python
- Limitations of Tesseract engine
Introduction
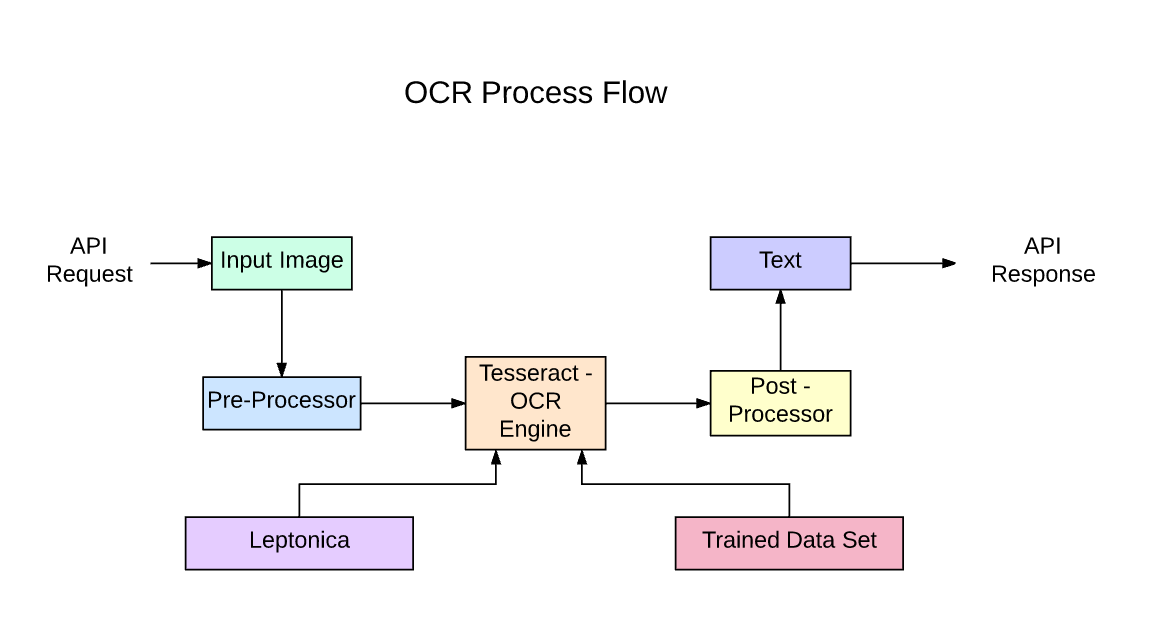
OCR = Optical Character Recognition. In other words, OCR systems transform a two-dimensional image of text, that could contain machine printed or handwritten text from its image representation into machine-readable text. OCR as a process generally consists of several sub-processes to perform as accurately as possible. The subprocesses are:
- Preprocessing of the Image
- Text Localization
- Character Segmentation
- Character Recognition
- Post Processing
The sub-processes in the list above of course can differ, but these are roughly steps needed to approach automatic character recognition. In OCR software, it’s main aim to identify and capture all the unique words using different languages from written text characters.
For almost two decades, optical character recognition systems have been widely used to provide automated text entry into computerized systems. Yet in all this time, conventional online OCR systems (like zonal OCR) have never overcome their inability to read more than a handful of type fonts and page formats. Proportionally spaced type (which includes virtually all typeset copy), laser printer fonts, and even many non-proportional typewriter fonts, have remained beyond the reach of these systems. And as a result, conventional OCR has never achieved more than a marginal impact on the total number of documents needing conversion into digital form.
Next-generation OCR engines deal with these problems mentioned above really good by utilizing the latest research in the area of deep learning. By leveraging the combination of deep models and huge datasets publicly available, models achieve state-of-the-art accuracies on given tasks. Nowadays it is also possible to generate synthetic data with different fonts using generative adversarial networks and few other generative approaches.
Optical Character Recognition remains a challenging problem when text occurs in unconstrained environments, like natural scenes, due to geometrical distortions, complex backgrounds, and diverse fonts. The technology still holds an immense potential due to the various use-cases of deep learning based OCR like
Have an OCR problem in mind? Want to reduce your organization’s data entry costs? Head over to Nanonets and build OCR models to extract text from images or extract data from PDFs with AI based PDF OCR!
There are a lot of optical character recognition software available. I did not find any quality comparison between them, but I will write about some of them that seem to be the most developer-friendly.
Tesseract – an open-source OCR engine that has gained popularity among OCR developers. Even though it can be painful to implement and modify sometimes, there weren’t too many free and powerful OCR alternatives on the market for the longest time. Tesseract began as a Ph.D. research project in HP Labs, Bristol. It gained popularity and was developed by HP between 1984 and 1994. In 2005 HP released Tesseract as an open-source software. Since 2006 it is developed by Google.

OCRopus – OCRopus is an open-source OCR system allowing easy evaluation and reuse of the OCR components by both researchers and companies. A collection of document analysis programs, not a turn-key OCR system. To apply it to your documents, you may need to do some image preprocessing, and possibly also train new models. In addition to the recognition scripts themselves, there are several scripts for ground truth editing and correction, measuring error rates, determining confusion matrices that are easy to use and edit.
Ocular – Ocular works best on documents printed using a hand press, including those written in multiple languages. It operates using the command line. It is a state-of-the-art historical OCR system. Its primary features are:
- Unsupervised learning of unknown fonts: requires only document images and a corpus of text.
- Ability to handle noisy documents: inconsistent inking, spacing, vertical alignment
- Support for multilingual documents, including those that have considerable word-level code-switching.
- Unsupervised learning of orthographic variation patterns including archaic spellings and printer shorthand.
- Simultaneous, joint transcription into both diplomatic (literal) and normalized forms.
SwiftOCR – I will also mention the OCR engine written in Swift since there is huge development being made into advancing the use of the Swift as the development programming language used for deep learning. Check out blog to find out more why. SwiftOCR is a fast and simple OCR library that uses neural networks for image recognition. SwiftOCR claims that their engine outperforms well known Tessaract library.
In this blog post, we will put focus on Tesseract OCR and find out more about how it works and how it is used.
Tesseract OCR
Tesseract is an open source text recognition (OCR) Engine, available under the Apache 2.0 license. It can be used directly, or (for programmers) using an API to extract printed text from images. It supports a wide variety of languages. Tesseract doesn’t have a built-in GUI, but there are several available from the 3rdParty page. Tesseract is compatible with many programming languages and frameworks through wrappers that can be found here. It can be used with the existing layout analysis to recognize text within a large document, or it can be used in conjunction with an external text detector to recognize text from an image of a single text line.
Tesseract 4.00 includes a new neural network subsystem configured as a text line recognizer. It has its origins in OCRopus’ Python-based LSTM implementation but has been redesigned for Tesseract in C++. The neural network system in Tesseract pre-dates TensorFlow but is compatible with it, as there is a network description language called Variable Graph Specification Language (VGSL), that is also available for TensorFlow.
To recognize an image containing a single character, we typically use a Convolutional Neural Network (CNN). Text of arbitrary length is a sequence of characters, and such problems are solved using RNNs and LSTM is a popular form of RNN. Read this post to learn more about LSTM.
Technology – How it works
LSTMs are great at learning sequences but slow down a lot when the number of states is too large. There are empirical results that suggest it is better to ask an LSTM to learn a long sequence than a short sequence of many classes. Tesseract developed from OCRopus model in Python which was a fork of a LSMT in C++, called CLSTM. CLSTM is an implementation of the LSTM recurrent neural network model in C++, using the Eigen library for numerical computations.
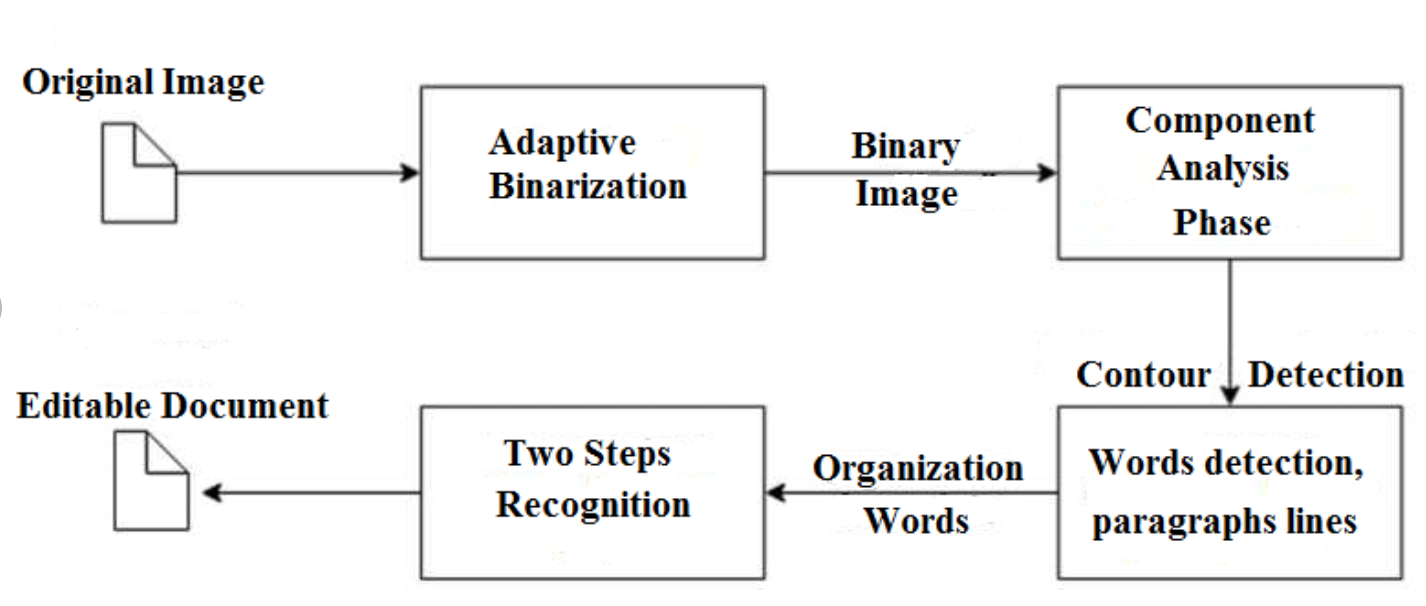
Legacy Tesseract 3.x was dependant on the multi-stage process where we can differentiate steps:
- Word finding
- Line finding
- Character classification
Word finding was done by organizing text lines into blobs, and the lines and regions are analyzed for fixed pitch or proportional text. Text lines are broken into words differently according to the kind of character spacing. Recognition then proceeds as a two-pass process. In the first pass, an attempt is made to recognize each word in turn. Each word that is satisfactory is passed to an adaptive classifier as training data. The adaptive classifier then gets a chance to more accurately recognize text lower down the page.
Modernization of the Tesseract tool was an effort on code cleaning and adding a new LSTM model. The input image is processed in boxes (rectangle) line by line feeding into the LSTM model and giving output. In the image below we can visualize how it works.

After adding a new training tool and training the model with a lot of data and fonts, Tesseract achieves better performance. Still, not good enough to work on handwritten text and weird fonts. It is possible to fine-tune or retrain top layers for experimentation.
Installing Tesseract
Installing tesseract on Windows is easy with the precompiled binaries found here. Do not forget to edit “path” environment variable and add tesseract path. For Linux or Mac installation it is installed with few commands.
After the installation verify that everything is working by typing command in the terminal or cmd:
$ tesseract --version
And you will see the output similar to:
tesseract 4.0.0
leptonica-1.76.0
libjpeg 9c : libpng 1.6.34 : libtiff 4.0.9 : zlib 1.2.8
Found AVX2
Found AVX
Found SSE
You can install the python wrapper for tesseract after this using pip.$ pip install pytesseract
Tesseract library is shipped with a handy command-line tool called tesseract. We can use this tool to perform OCR on images and the output is stored in a text file. If we want to integrate Tesseract in our C++ or Python code, we will use Tesseract’s API.
Running Tesseract with CLI
Call the Tesseract engine on the image with image_path and convert image to text, written line by line in the command prompt by typing the following:
$ tesseract image_path stdout
To write the output text in a file:
$ tesseract image_path text_result.txt
To specify the language model name, write language shortcut after -l flag, by default it takes English language:
$ tesseract image_path text_result.txt -l eng
By default, Tesseract expects a page of text when it segments an image. If you’re just seeking to OCR a small region, try a different segmentation mode, using the –psm argument. There are 14 modes available which can be found here. By default, Tesseract fully automates the page segmentation but does not perform orientation and script detection. To specify the parameter, type the following:
$ tesseract image_path text_result.txt -l eng --psm 6
There is also one more important argument, OCR engine mode (oem). Tesseract 4 has two OCR engines — Legacy Tesseract engine and LSTM engine. There are four modes of operation chosen using the –oem option.
0 Legacy engine only.
1 Neural nets LSTM engine only.
2 Legacy + LSTM engines.
3 Default, based on what is available.
OCR with Pytesseract and OpenCV
Pytesseract or Python-tesseract is an OCR tool for python that also serves as a wrapper for the Tesseract-OCR Engine. It can read and recognize text in images and is commonly used in python ocr image to text use cases.
It is also useful as a stand-alone invocation script to tesseract, as it can read all image types supported by the Pillow and Leptonica imaging libraries, including jpeg, png, gif, bmp, tiff, and others.
More info about Python approach read here. The code for this tutorial can be found in this repository.
import cv2
import pytesseract

img = cv2.imread('image.jpg')

# Adding custom options
custom_config = r'--oem 3 --psm 6'
pytesseract.image_to_string(img, config=custom_config)
Preprocessing for Tesseract
To avoid all the ways your tesseract output accuracy can drop, you need to make sure the image is appropriately pre-processed.
This includes rescaling, binarization, noise removal, deskewing, etc.
To preprocess image for OCR, use any of the following python functions or follow the OpenCV documentation.
import cv2
import numpy as np

img = cv2.imread('image.jpg')

# get grayscale image
def get_grayscale(image):
    return cv2.cvtColor(image, cv2.COLOR_BGR2GRAY)

# noise removal
def remove_noise(image):
    return cv2.medianBlur(image,5)

#thresholding
def thresholding(image):
    return cv2.threshold(image, 0, 255, cv2.THRESH_BINARY + cv2.THRESH_OTSU)[1]

#dilation
def dilate(image):
    kernel = np.ones((5,5),np.uint8)
    return cv2.dilate(image, kernel, iterations = 1)

#erosion
def erode(image):
    kernel = np.ones((5,5),np.uint8)
    return cv2.erode(image, kernel, iterations = 1)

#opening - erosion followed by dilation
def opening(image):
    kernel = np.ones((5,5),np.uint8)
    return cv2.morphologyEx(image, cv2.MORPH_OPEN, kernel)

#canny edge detection
def canny(image):
    return cv2.Canny(image, 100, 200)

#skew correction
def deskew(image):
    coords = np.column_stack(np.where(image > 0))
    angle = cv2.minAreaRect(coords)[-1]
     if angle < -45:
        angle = -(90 + angle)
    else:
        angle = -angle
    (h, w) = image.shape[:2]
    center = (w // 2, h // 2)
    M = cv2.getRotationMatrix2D(center, angle, 1.0)
    rotated = cv2.warpAffine(image, M, (w, h), flags=cv2.INTER_CUBIC, borderMode=cv2.BORDER_REPLICATE)
    return rotated

#template matching
def match_template(image, template):
    return cv2.matchTemplate(image, template, cv2.TM_CCOEFF_NORMED)
Let’s work with an example to see things better. This is what our original image looks like –

After preprocessing with the following code
image = cv2.imread('aurebesh.jpg')

gray = get_grayscale(image)
thresh = thresholding(gray)
opening = opening(gray)
canny = canny(gray)
and plotting the resulting images, we get the following results.
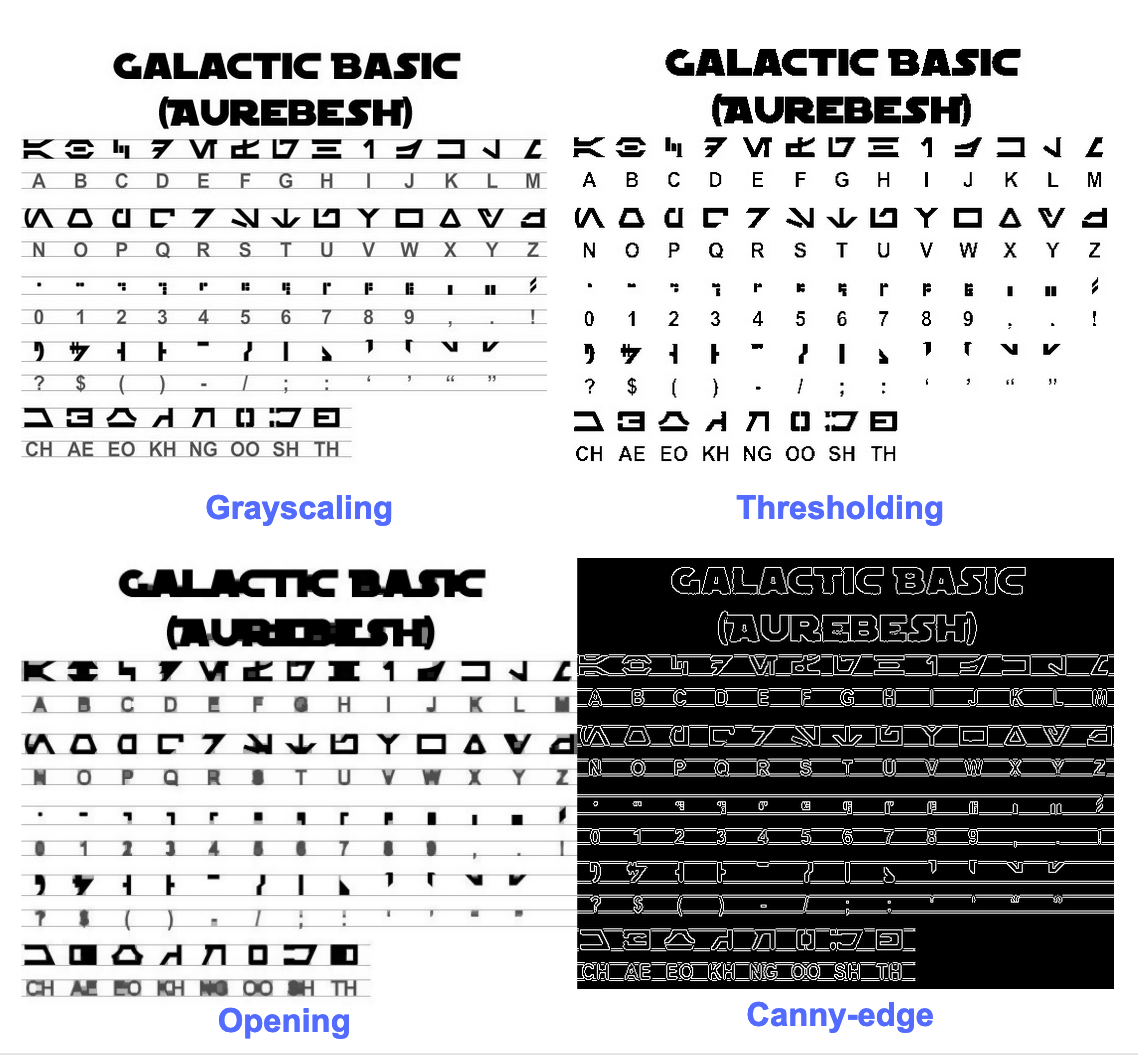
The output for the original image look like this –
GALACTIC BASIC
(AUREBESH)

RE HFVMEVEIiZwoyv Ze
ABC DE F GH I JK LM
N—0- PQ RST Uv WX
2 | Ff 8 G& Pf fF § 5 op 7
ee
5, jf FF Ty ee ee
=
334 477 OED
Here’s what the output for different preprocessed images looks like –
Canny edge image (not so good)-
CAE Cn Cae AS
(AUREBESE)

EA Na
oe SS
(Ne CI (ENE
a, ee oe ea
2
a a A: rc
|, |
a
Sear eo/e

ecm emclomt Cia cuoomct mi im
Thresholded image –
GALACTIC BASIC
(AVREBESH)
RS 7FVMeEVEi1iFf o£
A B C D EF GH IJ K LM
AOoder7Nnvroroava
N O P Q@R S$ TU VW XK Y¥ Z
7 ee For 8 Ro Pf F Boao om #
0 12 3 4 5 6 7 8 9 , . !
>» 1kr7 @ by FEN
2? S$ ( Por Foy of ee
ASGSANDIE
CH AE EO KH NG OO SH TH
Opening image –
GALACTIC BASIC
(AUREZEBELSH)
KEE VTMEUOU EB iw oN es
A BC D EF F @ H | J K LT Ww
AOGdrcrT7WTt HYOAVa4
WO P Q R BS T U VW WK y Z
i J
Oo 1 2 3 46 8 7 SC Ps,
VY ir- -rp,ptUuY?
a a a
AGoOAnNnoOID
CH AE BO KH ®@ OO SH TH
Getting boxes around text
Using Pytesseract, you can get the bounding box information for your OCR results using the following code.
The script below will give you bounding box information for each character detected by tesseract during OCR.
import cv2
import pytesseract

img = cv2.imread('image.jpg')

h, w, c = img.shape
boxes = pytesseract.image_to_boxes(img)
for b in boxes.splitlines():
    b = b.split(' ')
    img = cv2.rectangle(img, (int(b[1]), h - int(b[2])), (int(b[3]), h - int(b[4])), (0, 255, 0), 2)

cv2.imshow('img', img)
cv2.waitKey(0)
If you want boxes around words instead of characters, the function image_to_data will come in handy. You can use the image_to_data function with output type specified with pytesseract Output.
Have an OCR problem in mind? Want to digitize invoices, PDFs or number plates? Head over to Nanonets and build free online OCR models for free!
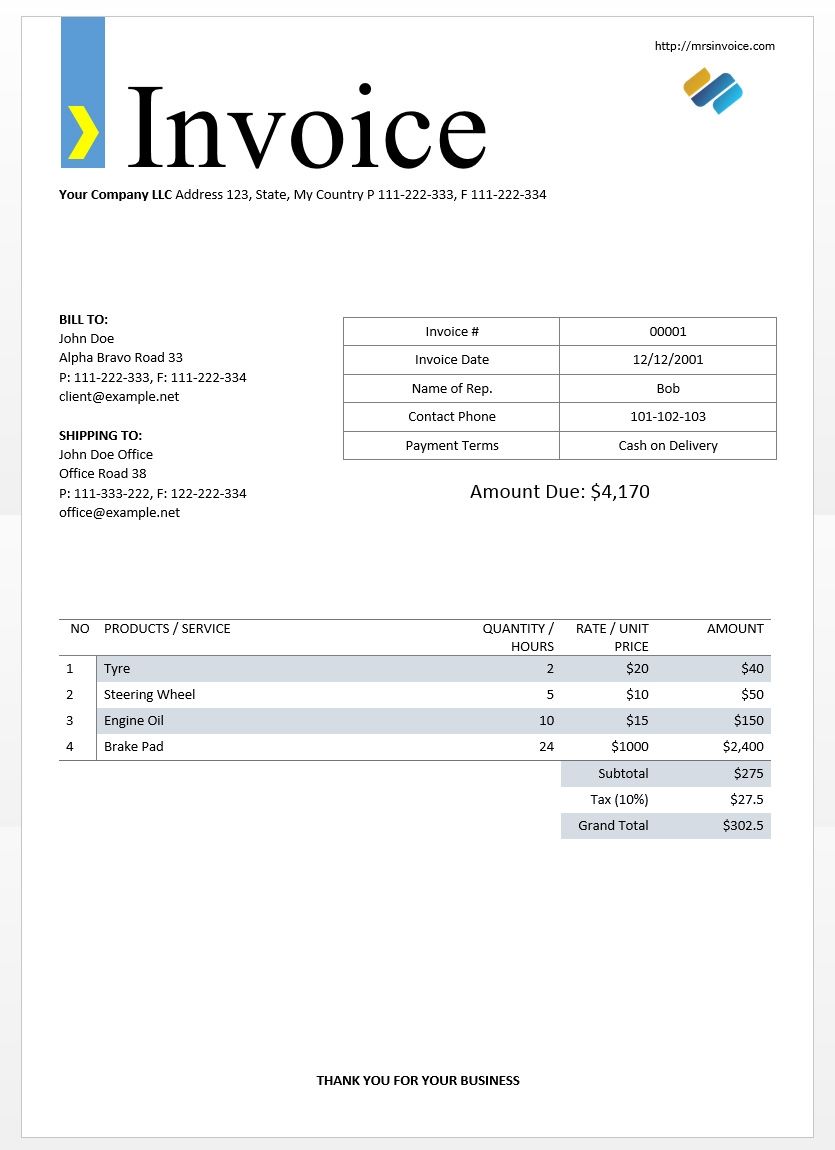
We will use the sample invoice image above to test out our tesseract outputs.
import cv2
import pytesseract
from pytesseract import Output

img = cv2.imread('invoice-sample.jpg')

d = pytesseract.image_to_data(img, output_type=Output.DICT)
print(d.keys())
This should give you the following output –dict_keys(['level', 'page_num', 'block_num', 'par_num', 'line_num', 'word_num', 'left', 'top', 'width', 'height', 'conf', 'text'])
Using this dictionary, we can get each word detected, their bounding box information, the text in them and the confidence scores for each.
You can plot the boxes by using the code below –
n_boxes = len(d['text'])
for i in range(n_boxes):
    if int(d['conf'][i]) > 60:
        (x, y, w, h) = (d['left'][i], d['top'][i], d['width'][i], d['height'][i])
        img = cv2.rectangle(img, (x, y), (x + w, y + h), (0, 255, 0), 2)

cv2.imshow('img', img)
cv2.waitKey(0)
Here’s what this would look like for the image of a sample invoice.

Text template matching
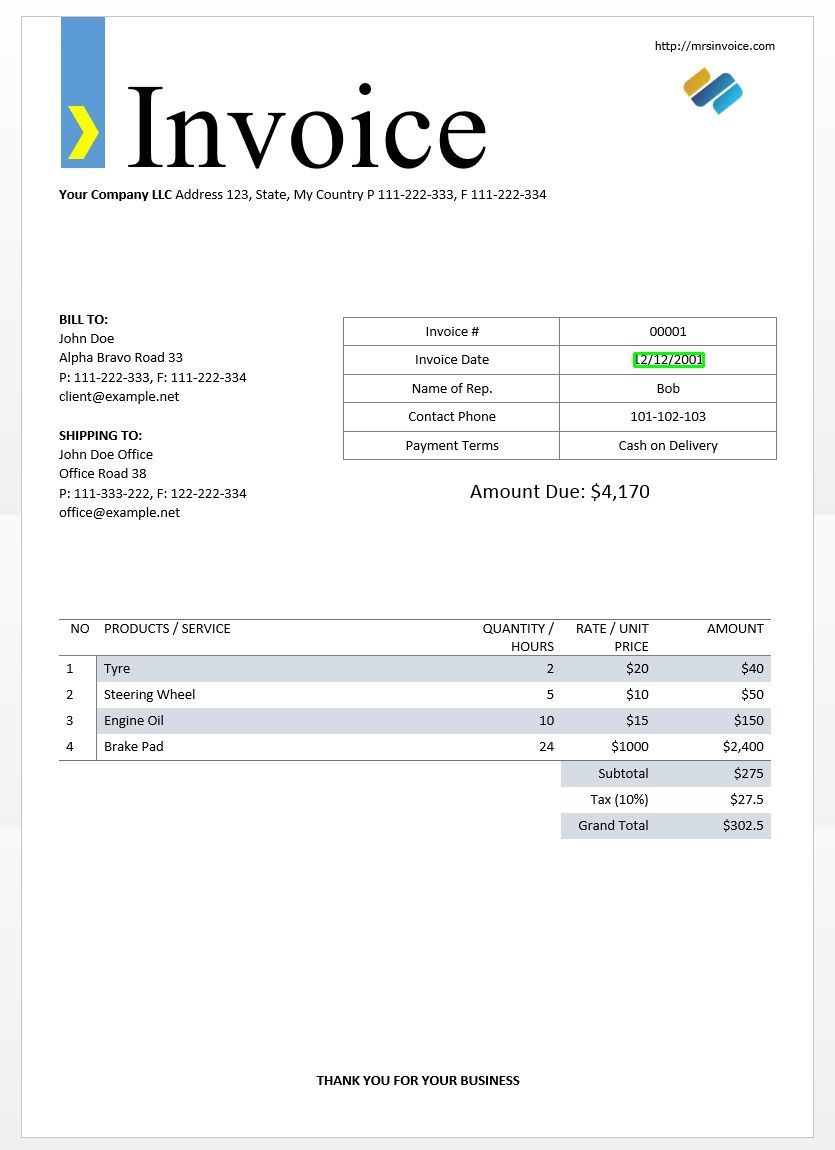
Take the example of trying to find where a date is in an image. Here our template will be a regular expression pattern that we will match with our OCR results to find the appropriate bounding boxes. We will use the regex module and the image_to_data function for this.
import re
import cv2
import pytesseract
from pytesseract import Output

img = cv2.imread('invoice-sample.jpg')
d = pytesseract.image_to_data(img, output_type=Output.DICT)
keys = list(d.keys())

date_pattern = '^(0[1-9]|[12][0-9]|3[01])/(0[1-9]|1[012])/(19|20)\d\d$'

n_boxes = len(d['text'])
for i in range(n_boxes):
    if int(d['conf'][i]) > 60:
    	if re.match(date_pattern, d['text'][i]):
	        (x, y, w, h) = (d['left'][i], d['top'][i], d['width'][i], d['height'][i])
	        img = cv2.rectangle(img, (x, y), (x + w, y + h), (0, 255, 0), 2)

cv2.imshow('img', img)
cv2.waitKey(0)
As expected, we get one box around the invoice date in the image.
Page segmentation modes
There are several ways a page of text can be analysed. The tesseract api provides several page segmentation modes if you want to run OCR on only a small region or in different orientations, etc.
Here’s a list of the supported page segmentation modes by tesseract –
0 Orientation and script detection (OSD) only.
1 Automatic page segmentation with OSD.
2 Automatic page segmentation, but no OSD, or OCR.
3 Fully automatic page segmentation, but no OSD. (Default)
4 Assume a single column of text of variable sizes.
5 Assume a single uniform block of vertically aligned text.
6 Assume a single uniform block of text.
7 Treat the image as a single text line.
8 Treat the image as a single word.
9 Treat the image as a single word in a circle.
10 Treat the image as a single character.
11 Sparse text. Find as much text as possible in no particular order.
12 Sparse text with OSD.
13 Raw line. Treat the image as a single text line, bypassing hacks that are Tesseract-specific.
To change your page segmentation mode, change the --psm argument in your custom config string to any of the above mentioned mode codes.
Detect orientation and script
You can detect the orientation of text in your image and also the script in which it is written. The following image –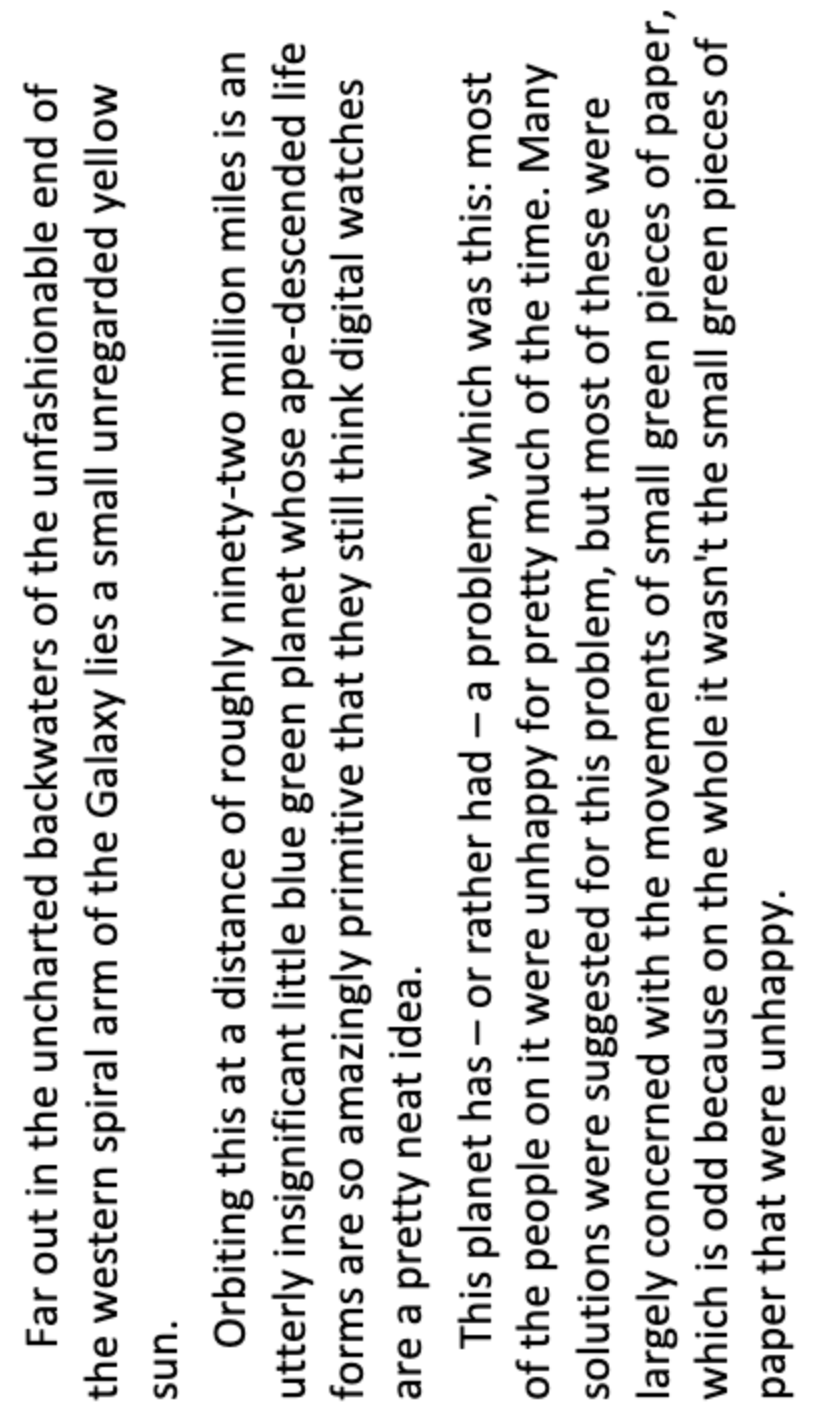
after running through the following code –
osd = pytesseract.image_to_osd(img)
angle = re.search('(?<=Rotate: )\d+', osd).group(0)
script = re.search('(?<=Script: )\d+', osd).group(0)
print("angle: ", angle)
print("script: ", script)
will print the following output.
angle: 90
script: Latin
Detect only digits
Take this image for example –
The text extracted from this image looks like this.
‘Customer name Hallium Energy services
Project NEHINS-HIB-HSA
lavoice no 43876324
Dated 17%h Nov2018
Pono 76496234
You can recognise only digits by changing the config to the following
custom_config = r'--oem 3 --psm 6 outputbase digits'
print(pytesseract.image_to_string(img, config=custom_config))
The output will look like this.
--

. 43876324
172018
0 76496234
Whitelisting characters
Say you only want to detect certain characters from the given image and ignore the rest. You can specify your whitelist of characters (here, we have used all the lowercase characters from a to z only) by using the following config.
custom_config = r'-c tessedit_char_whitelist=abcdefghijklmnopqrstuvwxyz --psm 6'
print(pytesseract.image_to_string(img, config=custom_config))
Output –
customername
roject
tnvoleeno
ated

alliumenergyservices
e
thovo
Blacklisting characters
If you are sure some characters or expressions definitely will not turn up in your text (the OCR will return wrong text in place of blacklisted characters otherwise), you can blacklist those characters by using the following config.
custom_config = r'-c tessedit_char_blacklist=0123456789 --psm 6'
pytesseract.image_to_string(img, config=custom_config)
Output –
Customer name Hallium Energy services
Project NEHINS-HIB-HSA
lavoice no
Dated %h Nov%
Pono
Detect in multiple languages
You can check the languages available by typing this in the terminal
$ tesseract --list-langs
To download tesseract for a specific language use
$ sudo apt-get install tesseract-ocr-LANG
where LANG is the three letter code for the language you need. You can find out the LANG values here.
You can download the .traindata file for the language you need from here and place it in $TESSDATA_PREFIX directory (this should be the same as where the tessdata directory is installed) and it should be ready to use.
Note – Only languages that have a .traineddata file format are supported by tesseract.
To specify the language you need your OCR output in, use the -l LANG argument in the config where LANG is the 3 letter code for what language you want to use.
custom_config = r'-l eng --psm 6'
pytesseract.image_to_string(img, config=custom_config)
Take this image for example –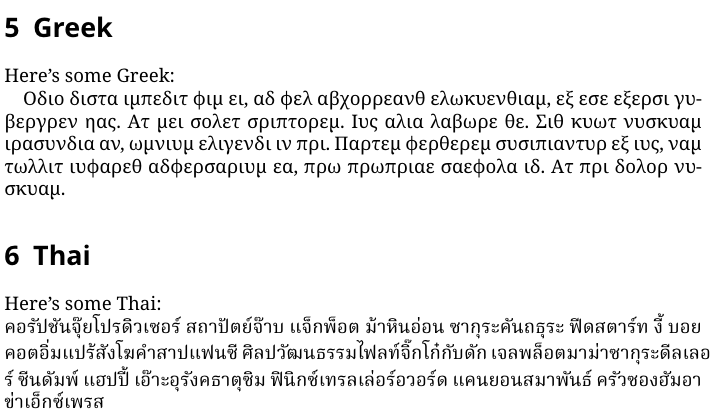
You can work with multiple languages by changing the LANG parameter as such –
custom_config = r'-l grc+tha+eng --psm 6'
pytesseract.image_to_string(img, config=custom_config)
and you will get the following output –
Here’s some Greek:

Οδιο διστα ιμπεδιτ φιμ ει, αδ φελ αβχορρεανθ ελωκυενθιαμ, εξ εσε εξερσι γυ-
βεργρεν ηας. Ατ μει σολετ σριπτορεμ. ἴυς αλια λαβωρε θε. Σιθ κυωτ νυσκυαμ
τρασυνδια αν, ὠμνιυμ ελιγενδι τιν πρι. Παρτεμ φερθερεμ συσιπιαντὺυρ εξ ιυς,ναμ
%0790 แ ร เง ๑ ๕ 80 ๕ 6 ๑ อ 06 ส 0 เง น อ ๓ , πρω πρωπριαε σαεφολα ιδ. Ατ πρι δολορ νυ-
σκυαμ.

6 Thai

Here’s some Thai: ν᾿

ค อ ร ั ป ซั น จ ุ ้ ย โป ร ด ิ ว เซ อ ร ์ ส ถา ป ั ต ย ์ จ ๊ า บ แจ ็ ก พ ็ อ ต ม ้ า ห ิ น อ ่ อ น ซา ก ุ ร ะ ค ั น ถ ธ ุ ร ะ ฟิ ด ส ต า ร ์ ท ง ี ้ บ อ ย
ค อ ต อ ื ่ ม แป ร ั ส ั ง โฆ ค ํ า ส า ป แฟ น ซี ศิ ล ป ว ั ฒ น ธร ร ม ไฟ ล ท ์ จ ิ ๊ ก โก ๋ ก ั บ ด ั ก เจ ล พ ล ็ อ ต ม า ม ่ า ซา ก ุ ร ะ ด ี ล เล อ
ร ์ ซี น ด ั ม พ ์ แฮ ป ป ี ้ เอ ๊ ้ า ะ อ ุ ร ั ง ค ธา ต ุ ซิ ม ฟิ น ิ ก ซ์ เท ร ล เล ่ อ ร ์ อ ว อ ร ์ ด แค น ย อ น ส ม า พ ั น ธ์ ค ร ั ว ซอ ง ฮั ม อ า
ข่ า เอ ็ ก ซ์ เพ ร ส
Note – The language specified first to the -l parameter is the primary language.
Unfortunately tesseract does not have a feature to detect language of the text in an image automatically. An alternative solution is provided by another python module called langdetect which can be installed via pip.
$ pip install langdetect
This module again, does not detect the language of text using an image but needs string input to detect the language from. The best way to do this is by first using tesseract to get OCR text in whatever languages you might feel are in there, using langdetect to find what languages are included in the OCR text and then run OCR again with the languages found.
Say we have a text we thought was in english and portugese.
custom_config = r'-l eng+por --psm 6'
txt = pytesseract.image_to_string(img, config=custom_config)

from langdetect import detect_langs
detect_langs(txt)
This should output a list of languages in the text and their probabilities.
[en:0.714282468983554, es:0.2857145605644145]
The language codes used by langdetect follow ISO 639-1 codes. To compare, please check this and this. We find that the language used in the text are english and spanish instead.
We get the text again by changing the config to
custom_config = r'-l eng+spa --psm 6'
txt = pytesseract.image_to_string(img, config=custom_config)
Note – Tesseract performs badly when, in an image with multiple languages, the languages specified in the config are wrong or aren’t mentioned at all. This can mislead the langdetect module quite a bit as well.
Using tessdata_fast
If speed is a major concern for you, you can replace your tessdata language models with tessdata_fast models which are 8-bit integer versions of the tessdata models.
According to the tessdata_fast github –
This repository contains fast integer versions of trained models for the Tesseract Open Source OCR Engine.
These models only work with the LSTM OCR engine of Tesseract 4.
- These are a speed/accuracy compromise as to what offered the best “value for money” in speed vs accuracy.
- For some languages, this is still best, but for most not.
- The “best value for money” network configuration was then integerized for further speed.
- Most users will want to use these traineddata files to do OCR and these will be shipped as part of Linux distributions eg. Ubuntu 18.04.
- Fine tuning/incremental training will NOT be possible from these
fastmodels, as they are 8-bit integer. - When using the models in this repository, only the new LSTM-based OCR engine is supported. The legacy
tesseractengine is not supported with these files, so Tesseract’s oem modes ‘0’ and ‘2’ won’t work with them.
To use tessdata_fast models instead of tessdata, all you need to do is download your tessdata_fast language data file from here and place it inside your $TESSDATA_PREFIX directory.
Need to digitize documents, receipts or invoices but too lazy to code? Head over to Nanonets and build OCR models for free!
Training Tesseract on custom data
Tesseract 4.00 includes a new neural network-based recognition engine that delivers significantly higher accuracy on document images. Neural networks require significantly more training data and train a lot slower than base Tesseract. For Latin-based languages, the existing model data provided has been trained on about 400000 text lines spanning about 4500 fonts.
In order to successfully run the Tesseract 4.0 LSTM training tutorial, you need to have a working installation of Tesseract 4 and Tesseract 4 Training Tools and also have the training scripts and required trained data files in certain directories. Visit github repo for files and tools.
Tesseract 4.00 takes a few days to a couple of weeks for training from scratch. Even with all these new training data, therefore here are few options for training:
- Fine-tune – Starting with an existing trained language, train on your specific additional data. For example training on a handwritten dataset and some additional fonts.
- Cut off the top layer – from the network and retrain a new top layer using the new data. If fine-tuning doesn’t work, this is most likely the next best option. The analogy why is this useful, take for an instance models trained on ImageNet dataset. The goal is to build a cat or dog classifier, lower layers in the model are good at low-level abstraction as corners, horizontal and vertical lines, but higher layers in model are combining those features and detecting cat or dog ears, eyes, nose and so on. By retraining only top layers you are using knowledge from lower layers and combining with your new different dataset.
- Retrain from scratch – This is a very slow approach unless you have a very representative and sufficiently large training set for your problem. The best resource for training from scratch is following this github repo.
A guide on how to train on your custom data and create .traineddata files can be found here and here.
We will not be covering the code for training using Tesseract in this blog post.
Limitations of Tesseract
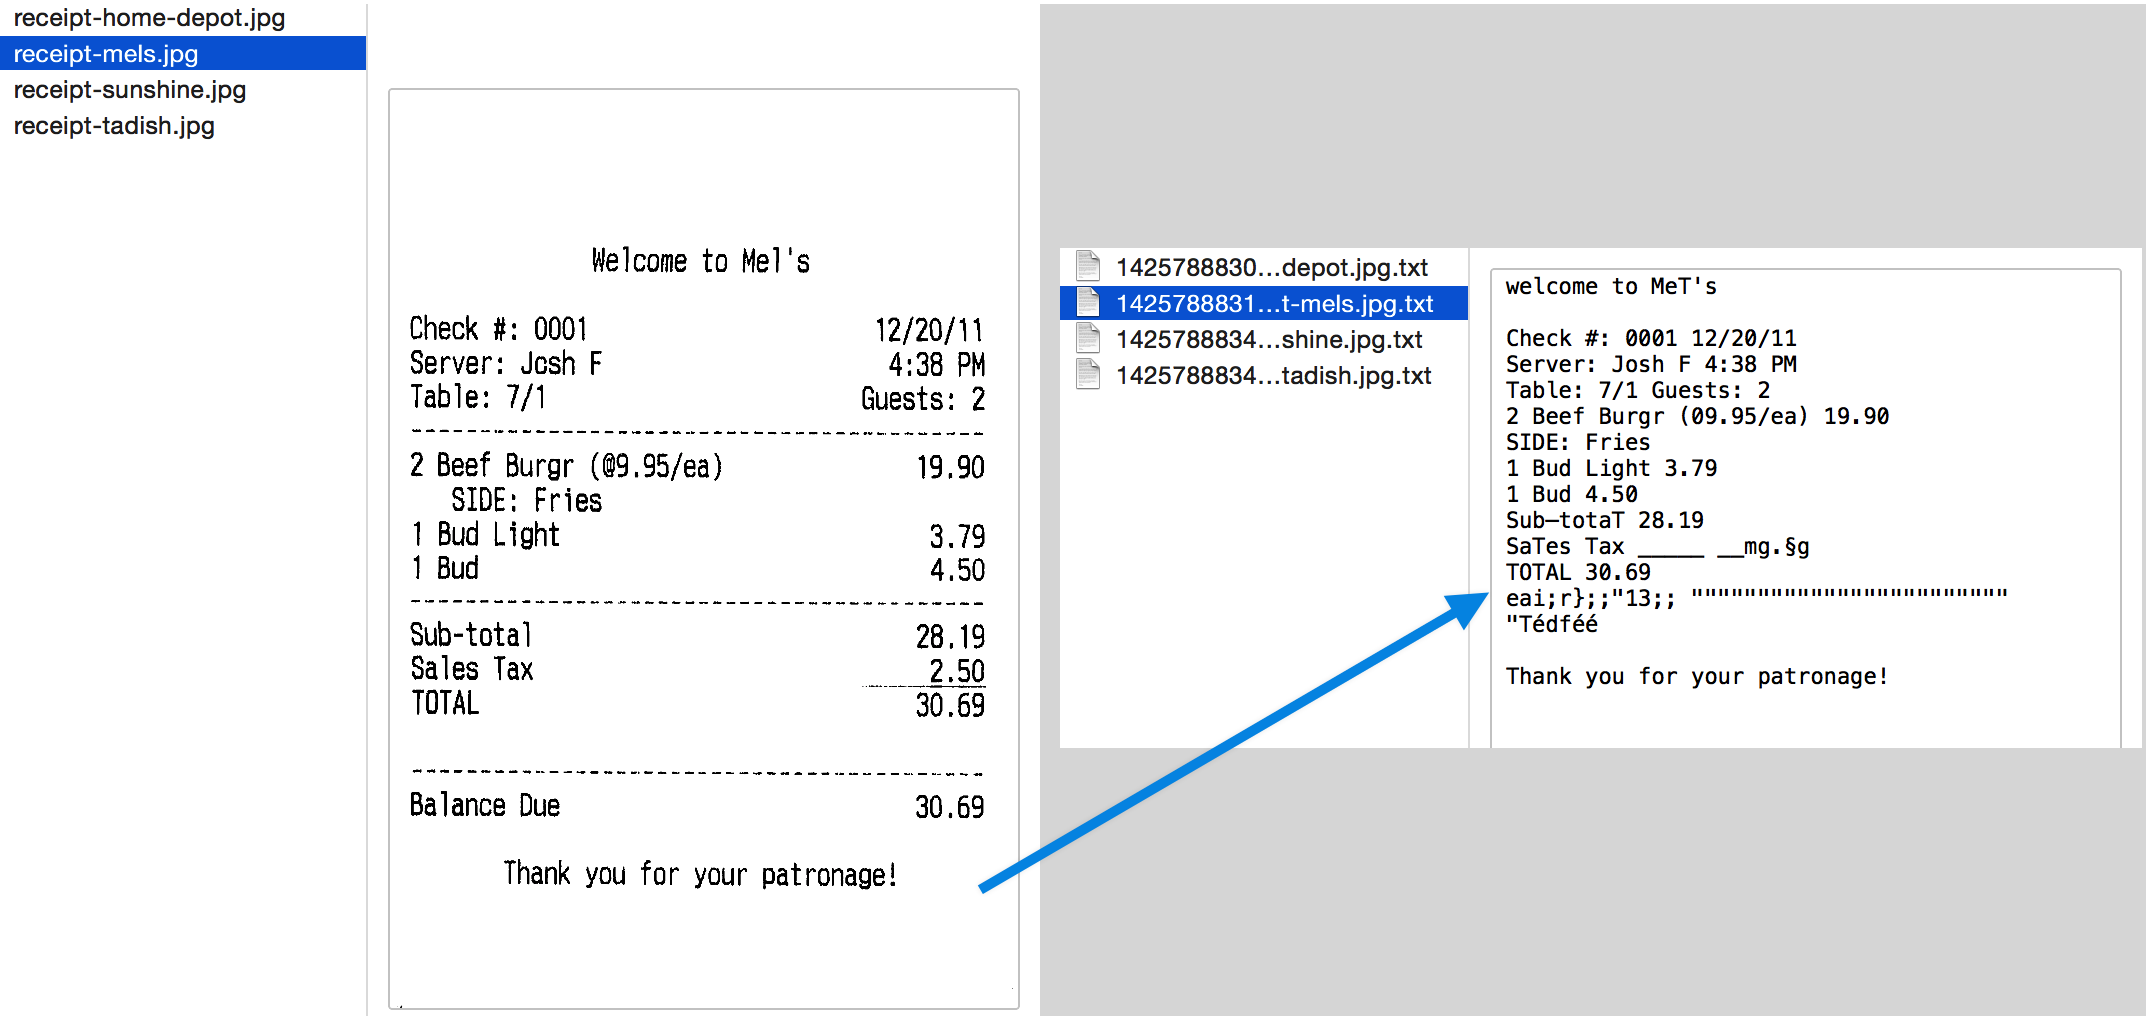
Tesseract works best when there is a clean segmentation of the foreground text from the background. In practice, it can be extremely challenging to guarantee these types of setup. There are a variety of reasons you might not get good quality output from Tesseract like if the image has noise on the background. The better the image quality (size, contrast, lightning) the better the recognition result. It requires a bit of preprocessing to improve the OCR results, images need to be scaled appropriately, have as much image contrast as possible, and the text must be horizontally aligned. Tesseract OCR is quite powerful but does have the following limitations.
Tesseract limitations summed in the list.
- The OCR is not as accurate as some commercial solutions available to us.
- Doesn’t do well with images affected by artifacts including partial occlusion, distorted perspective, and complex background.
- It is not capable of recognizing handwriting.
- It may find gibberish and report this as OCR output.
- If a document contains languages outside of those given in the -l LANG arguments, results may be poor.
- It is not always good at analyzing the natural reading order of documents. For example, it may fail to recognize that a document contains two columns, and may try to join text across columns.
- Poor quality scans may produce poor quality OCR.
- It does not expose information about what font family text belongs to.
There’s of course a better, much simpler and more intuitive way to perform OCR tasks.
OCR with Nanonets

The Nanonets OCR API allows you to build OCR models with ease. You do not have to worry about pre-processing your images or worry about matching templates or build rule based engines to increase the accuracy of your OCR model.
You can upload your data, annotate it, set the model to train and wait for getting predictions through a browser based UI without writing a single line of code, worrying about GPUs or finding the right architectures for your deep learning models. You can also acquire the JSON responses of each prediction to integrate it with your own systems and build machine learning powered apps built on state of the art algorithms and a strong infrastructure.
Using the GUI: https://app.nanonets.com/
You can also use the Nanonets-OCR API by following the steps below:
Step 1: Clone the Repo, Install dependencies
git clone https://github.com/NanoNets/nanonets-ocr-sample-python.git
cd nanonets-ocr-sample-python
sudo pip install requests tqdm
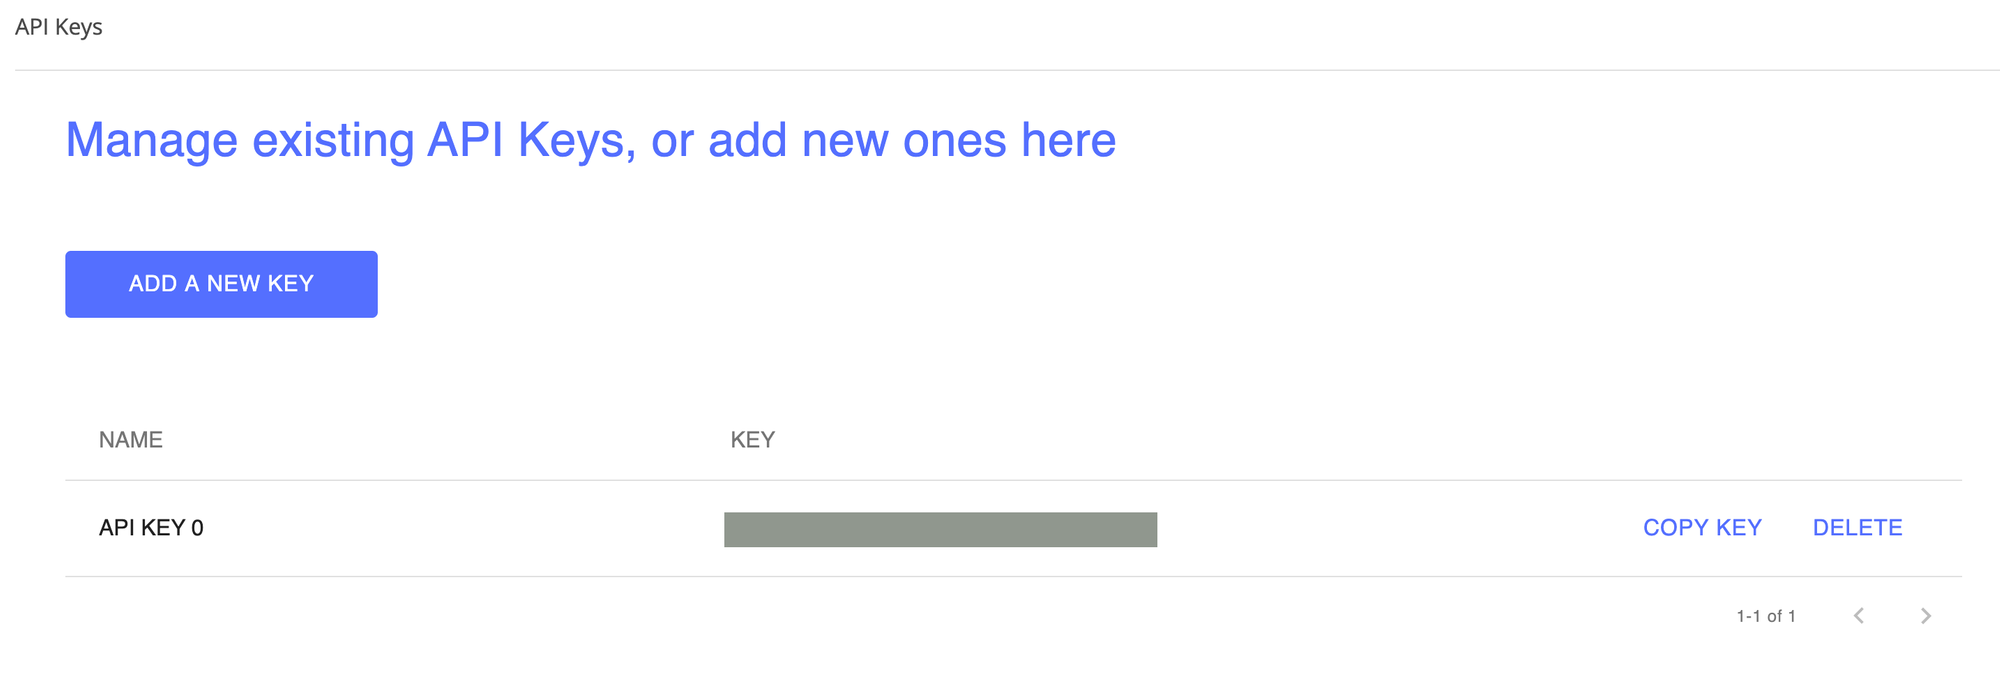
Step 2: Get your free API Key
Get your free API Key from https://app.nanonets.com/#/keys
Step 3: Set the API key as an Environment Variable
export NANONETS_API_KEY=YOUR_API_KEY_GOES_HERE
Step 4: Create a New Model
python ./code/create-model.py
Note: This generates a MODEL_ID that you need for the next step
Step 5: Add Model Id as Environment Variable
export NANONETS_MODEL_ID=YOUR_MODEL_ID
Note: you will get YOUR_MODEL_ID from the previous step
Step 6: Upload the Training Data
The training data is found in images (image files) and annotations (annotations for the image files)
python ./code/upload-training.py
Step 7: Train Model
Once the Images have been uploaded, begin training the Model
python ./code/train-model.py
Step 8: Get Model State
The model takes ~2 hours to train. You will get an email once the model is trained. In the meanwhile you check the state of the model
python ./code/model-state.py
Step 9: Make Prediction
Once the model is trained. You can make predictions using the model
python ./code/prediction.py ./images/151.jpg
Nanonets and Humans in the Loop
The ‘Moderate’ screen aids the correction and entry processes and reduce the manual reviewer’s workload by almost 90% and reduce the costs by 50% for the organisation.
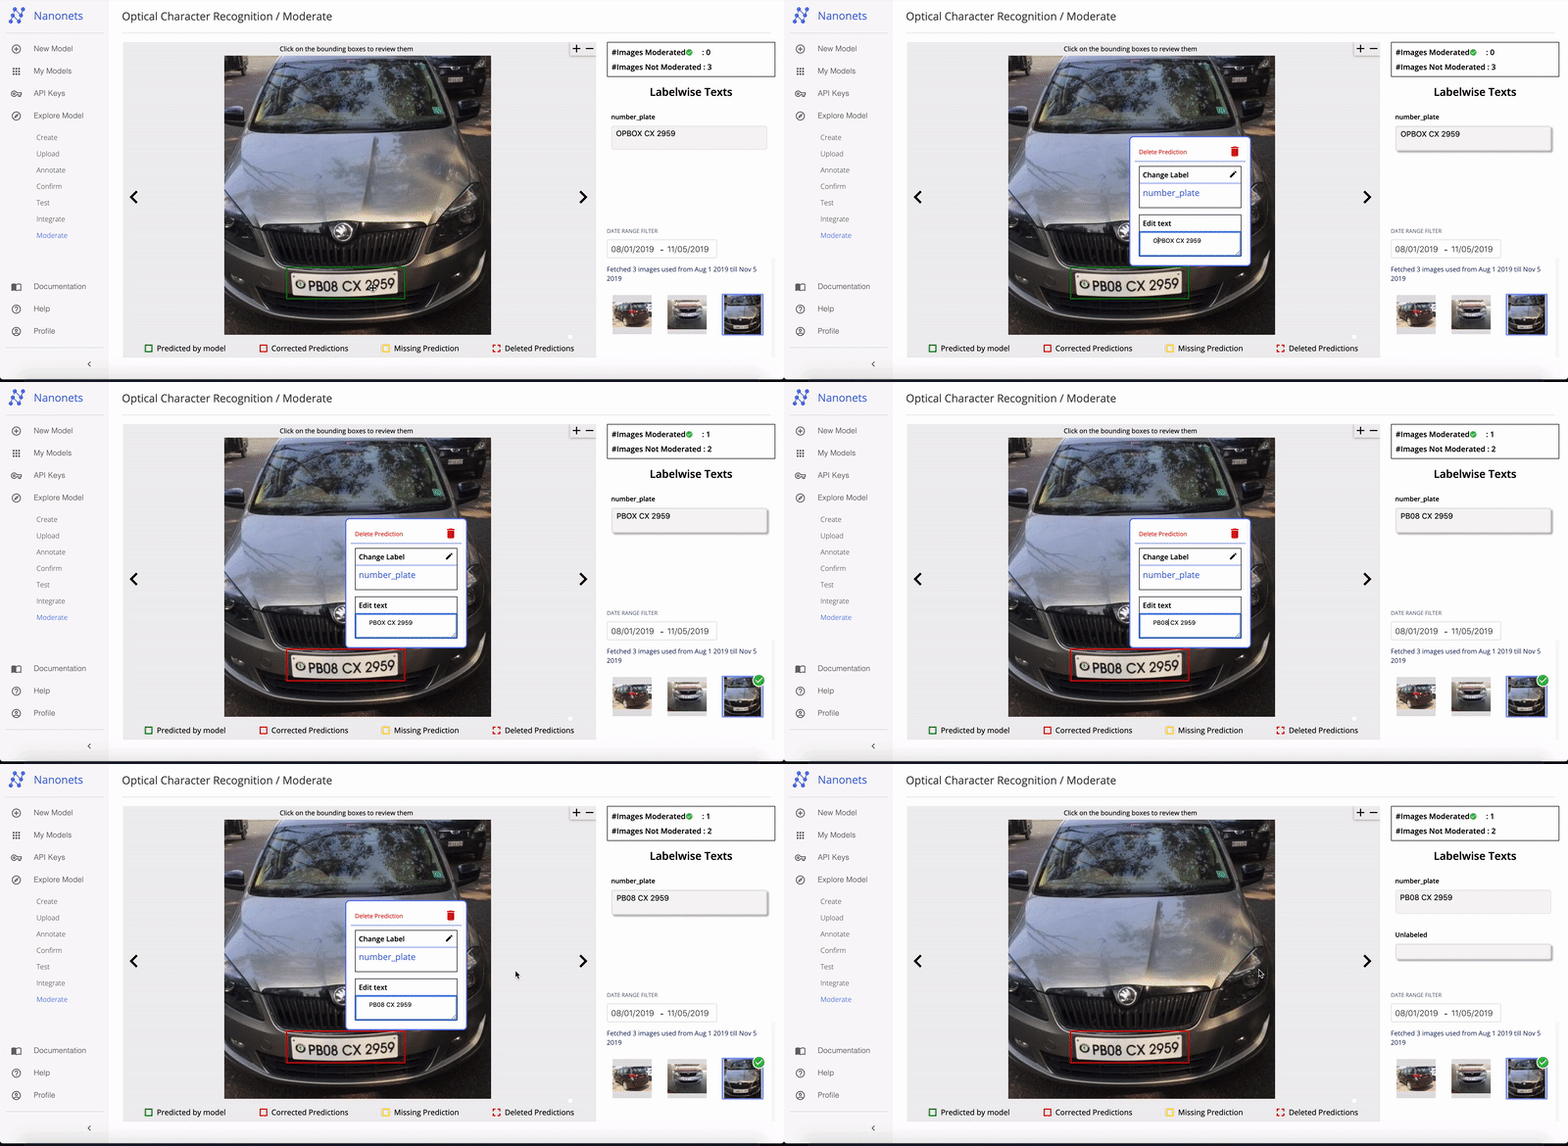
Features include
- Track predictions which are correct
- Track which ones are wrong
- Make corrections to the inaccurate ones
- Delete the ones that are wrong
- Fill in the missing predictions
- Filter images with date ranges
- Get counts of moderated images against the ones not moderated
All the fields are structured into an easy to use GUI which allows the user to take advantage of the OCR technology and assist in making it better as they go, without having to type any code or understand how the technology works.
Have an OCR problem in mind? Want to automate your organization’s data entry costs? Head over to Nanonets and build OCR models to convert image to text or extract data from PDFs!
Conclusion
Just as deep learning has impacted nearly every facet of computer vision, the same is true for character recognition and handwriting recognition. Deep learning based models have managed to obtain unprecedented text recognition accuracy, far beyond traditional information extraction and machine learning image processing approaches.
Tesseract performs well when document images follow the next guidelines:
- Clean segmentation of the foreground text from background
- Horizontally aligned and scaled appropriately
- High-quality image without blurriness and noise
The latest release of Tesseract 4.0 supports deep learning based OCR that is significantly more accurate. The OCR engine itself is built on a Long Short-Term Memory (LSTM) network, a kind of Recurrent Neural Network (RNN).
Tesseract is perfect for scanning clean documents and comes with pretty high accuracy and font variability since its training was comprehensive. I would say that Tesseract is a go-to tool if your task is scanning of books, documents and printed text on a clean white background.
Further Reading
Update:
A lot of people asked us how they can get date in the form of text or using when it detects date or any other specific data so they could append to list.
Here’s the answer:
In the code to draw a bounding box around the date box, you will notice a line which matches the regex pattern withd['text']. It only draws a box if the pattern matches. You could simply extract the values fromd['text']once the pattern matches and append them to a list.
Update 2:
To address questions around non-English OCR, we have updated further reading lists.


